

Apache Hadoop is one of the most popular frameworks for storing and processing large datasets across multiple systems. If you’re getting started with big data technologies, setting up Hadoop in pseudo-distributed mode is the perfect way to learn how its core components work without managing a full cluster.
In this tutorial, you’ll learn how to install and configure Hadoop on Ubuntu using a single machine. By the end, you’ll have a working Hadoop environment with HDFS, YARN, and MapReduce running locally.
Note: This guide uses Hadoop in pseudo-distributed mode, where all Hadoop services run on a single server while behaving like a small cluster.
What Is Apache Hadoop?
Apache Hadoop is an open-source framework designed for storing and processing large volumes of data across multiple computers.
Instead of relying on a single powerful machine, Hadoop distributes data and workloads across clustered systems, making it scalable and fault-tolerant.
Hadoop consists of three main components:
- HDFS (Hadoop Distributed File System) – HDFS stores data across multiple machines by splitting large files into smaller blocks. This helps improve reliability and scalability.
- YARN (Yet Another Resource Negotiator) – YARN manages cluster resources such as CPU and memory while scheduling and monitoring jobs.
- MapReduce – MapReduce is Hadoop’s data processing engine that divides large tasks into smaller jobs, processes them in parallel, and combines the results.
Common Hadoop Use Cases
Hadoop is widely used for:
- Large-scale data analytics
- Data warehouses and data lakes
- Log and event analysis
- Recommendation engines
- Machine learning workloads
- Processing structured and unstructured data
Prerequisites
Before starting, make sure your system meets the following requirements:
- Ubuntu server
- At least 2 CPU cores
- Minimum 4 GB RAM
- At least 20 GB free disk space
- Sudo privileges
- OpenJDK 11
- OpenSSH Server and OpenSSH Client
Step 1: Update Ubuntu Packages
Start by updating your package lists and installed packages.
sudo apt update && sudo apt upgrade -y
This ensures your system has the latest package information and security updates before installing Hadoop.
Step 2: Install OpenJDK 11
Hadoop is built using Java, so a Java Development Kit (JDK) must be installed before proceeding.
Install OpenJDK 11:
sudo apt install openjdk-11-jdk -y
Verify the installation:
java --version
The output should display the installed Java version.
Step 3: Create a Dedicated Hadoop User
Using a dedicated user account improves security and simplifies Hadoop management.
Create a new user:
sudo adduser hadoop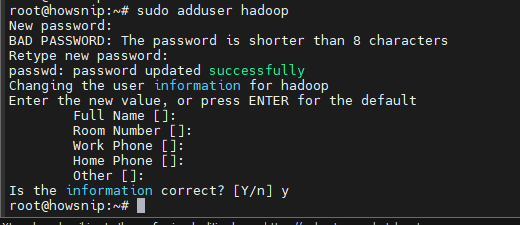
Follow the prompts to set a password and optional user information.
Grant sudo privileges to the user:
sudo usermod -aG sudo hadoopSwitch to the new account:
su - hadoop
After entering the password, your terminal session will run as the hadoop user.
Step 4: Configure Passwordless SSH
Hadoop uses SSH to communicate between nodes. Even in pseudo-distributed mode, Hadoop expects SSH access to localhost.
Verify SSH Installation
Check the SSH client version:
ssh -V
Check whether the SSH service is running:
systemctl status ssh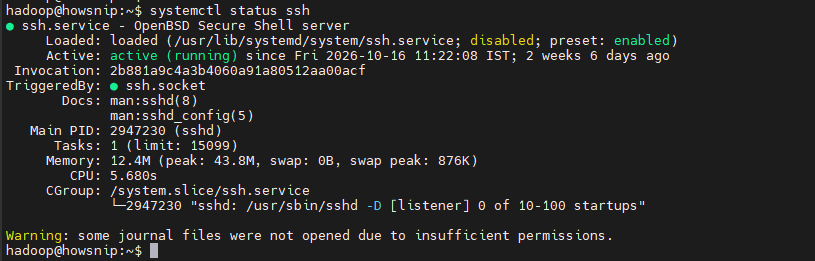
If SSH is not installed, install and enable it:
sudo apt install openssh-server openssh-client -y
sudo systemctl enable ssh
Generate an SSH Key Pair
Create an RSA key pair without a passphrase:
ssh-keygen -t rsa -P '' -f ~/.ssh/id_rsaThis generates public and private SSH keys for the Hadoop user.
Add the Public Key to Authorized Keys
Allow the user to authenticate locally without a password:
cat ~/.ssh/id_rsa.pub >> ~/.ssh/authorized_keysSet the correct permissions:
chmod 600 ~/.ssh/authorized_keysTest Passwordless SSH
Connect to localhost:
ssh localhost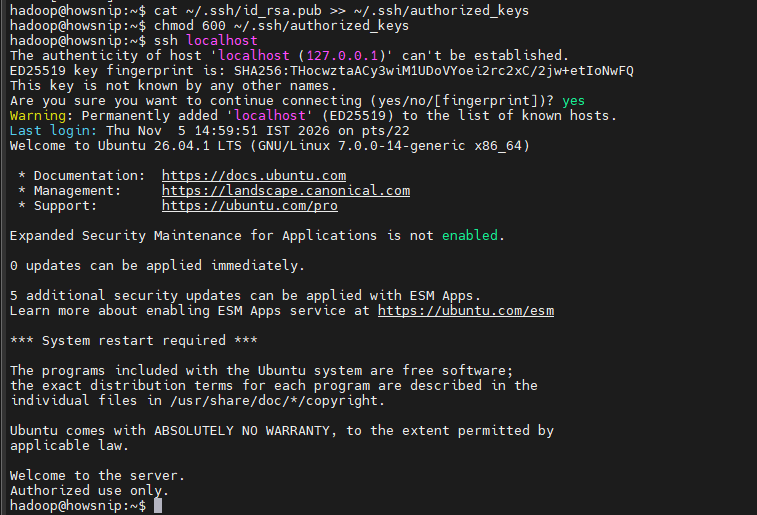
The first connection may ask you to confirm the host fingerprint. Type:
yes
If configured correctly, you’ll log in without entering a password.
Exit the SSH session:
exit
Step 5: Download and Extract Hadoop
Download the Hadoop archive as the hadoop user.
Move to your home directory:
cd ~Download Hadoop:
wget https://dlcdn.apache.org/hadoop/common/hadoop-3.4.1/hadoop-3.4.1.tar.gz
Extract the downloaded archive:
tar -xzf hadoop-*.tar.gz
Move Hadoop to a standard installation location:
sudo mv hadoop-3.4.1 /usr/local/hadoopAssign ownership to the Hadoop user:
sudo chown -R hadoop:hadoop /usr/local/hadoopNote: The download URL and version shown above are from the original guide. Always verify the latest stable release on the official Apache Hadoop website before downloading.
Step 6: Configure Hadoop Environment Variables
Environment variables allow Linux and Hadoop scripts to locate required binaries and configuration files.
Update .bashrc
Open the file:
nano ~/.bashrc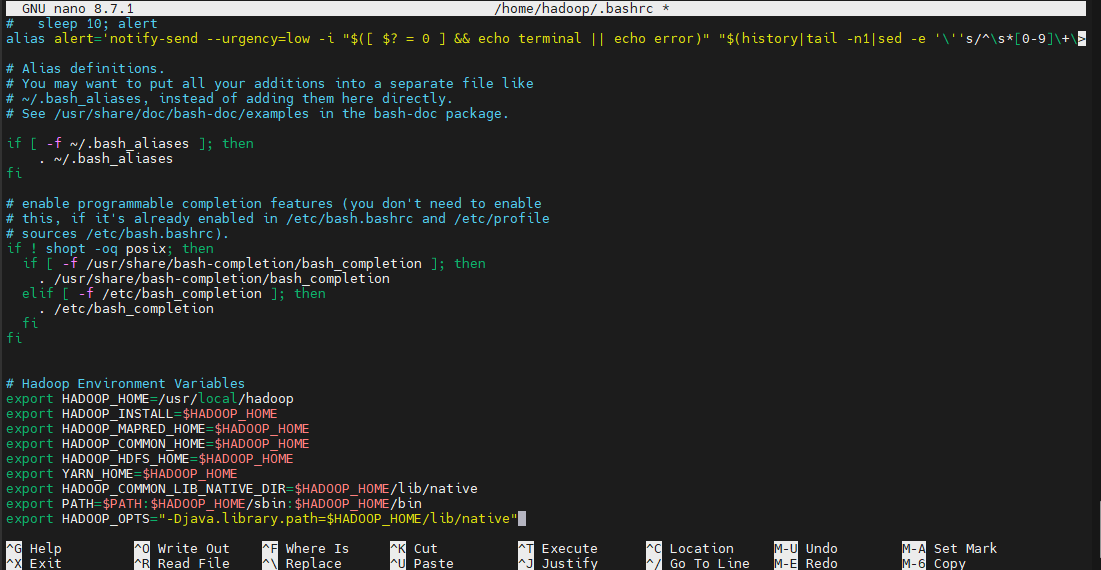
Add the following Hadoop variables:
# Hadoop Environment Variables
export HADOOP_HOME=/usr/local/hadoop
export HADOOP_INSTALL=$HADOOP_HOME
export HADOOP_MAPRED_HOME=$HADOOP_HOME
export HADOOP_COMMON_HOME=$HADOOP_HOME
export HADOOP_HDFS_HOME=$HADOOP_HOME
export YARN_HOME=$HADOOP_HOME
export HADOOP_COMMON_LIB_NATIVE_DIR=$HADOOP_HOME/lib/native
export PATH=$PATH:$HADOOP_HOME/sbin:$HADOOP_HOME/bin
export HADOOP_OPTS="-Djava.library.path=$HADOOP_HOME/lib/native"
Next, add Java-related variables:
export JAVA_HOME=$(dirname $(dirname $(readlink -f $(which java))))
export PATH=$PATH:$JAVA_HOME/bin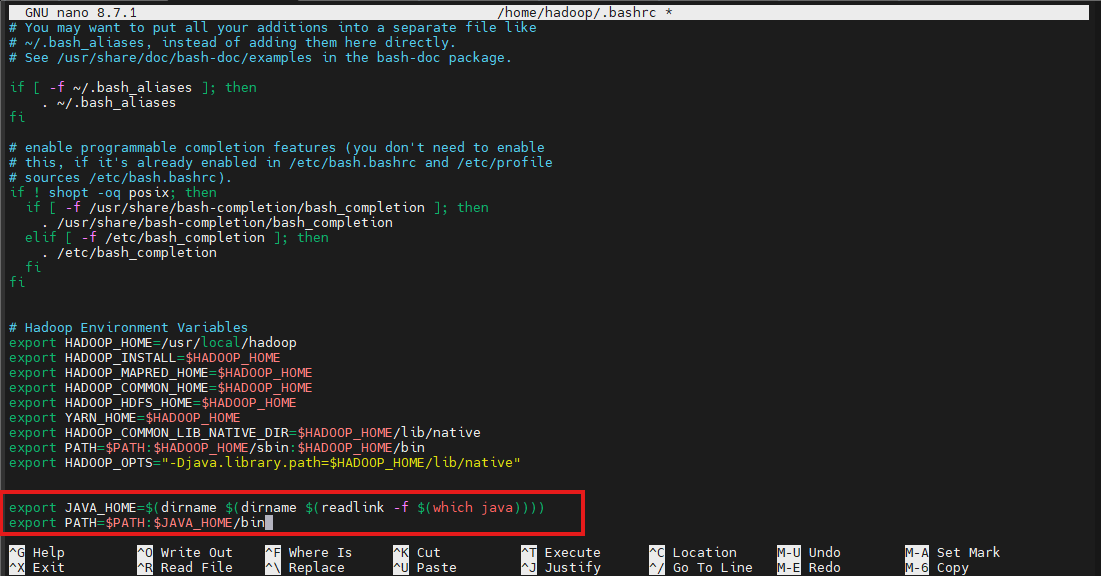
Save and close the file.
Apply the changes:
source ~/.bashrcVerify the Java installation path:
echo $JAVA_HOME
Verify Hadoop installation:
hadoop version
Confirm Hadoop’s installation directory:
echo $HADOOP_HOME
Configure JAVA_HOME in Hadoop
Edit Hadoop’s environment configuration file:
nano $HADOOP_HOME/etc/hadoop/hadoop-env.sh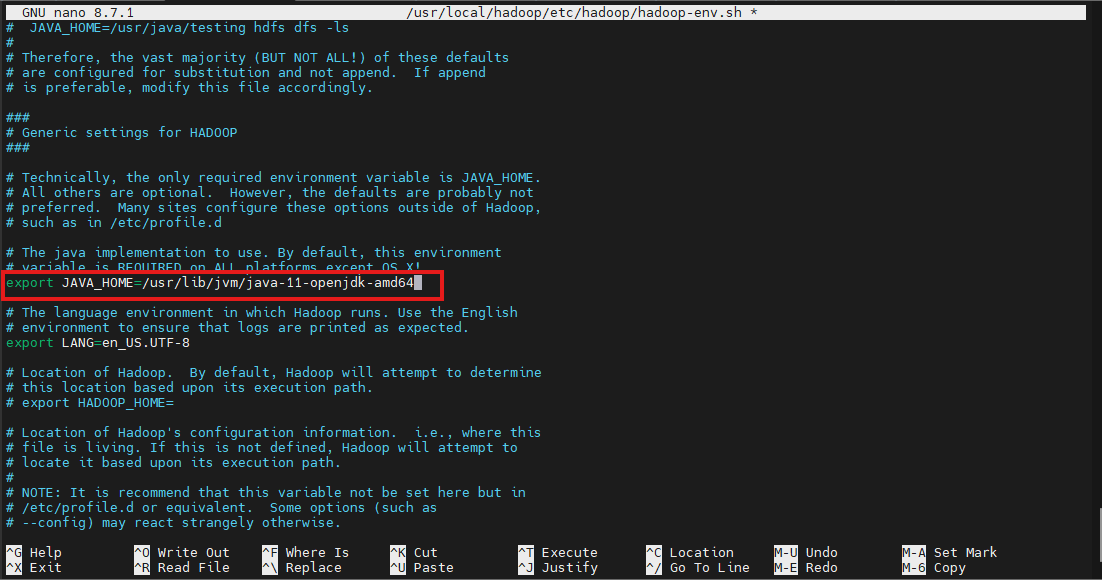
Locate the line:
# export JAVA_HOME=
Replace it with:
export JAVA_HOME=/usr/lib/jvm/java-11-openjdk-amd64
Save the file and exit.
Step 7: Configure Hadoop for Pseudo-Distributed Mode
Hadoop’s behavior is controlled through XML configuration files located in:
$HADOOP_HOME/etc/hadoop/Create HDFS Storage Directories
Create directories for NameNode and DataNode data:
mkdir -p $HADOOP_HOME/hdfs/namenode
mkdir -p $HADOOP_HOME/hdfs/datanode
Set ownership:
sudo chown -R hadoop:hadoop $HADOOP_HOME/hdfsConfigure core-site.xml
Open the file:
nano $HADOOP_HOME/etc/hadoop/core-site.xml
Replace the empty configuration block with:
<configuration>
<property>
<name>fs.defaultFS</name>
<value>hdfs://localhost:9000</value>
<description>The default file system URI</description>
</property>
</configuration>
This configuration tells Hadoop to use HDFS running locally on port 9000.
Configure hdfs-site.xml
Open:
nano $HADOOP_HOME/etc/hadoop/hdfs-site.xml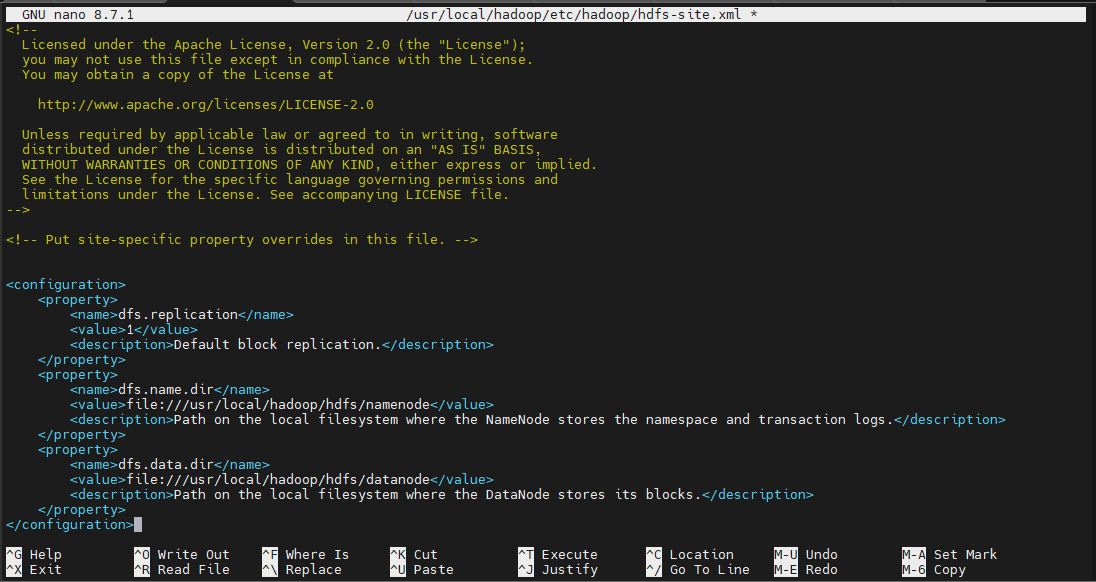
Add:
<configuration>
<property>
<name>dfs.replication</name>
<value>1</value>
<description>Default block replication.</description>
</property>

<property>
<name>dfs.name.dir</name>
<value>file:///usr/local/hadoop/hdfs/namenode</value>
<description>Storage location for NameNode metadata.</description>
</property>

<property>
<name>dfs.data.dir</name>
<value>file:///usr/local/hadoop/hdfs/datanode</value>
<description>Storage location for DataNode blocks.</description>
</property>
</configuration>
Because this is a single-node setup, replication is set to 1.
Configure mapred-site.xml
Open:
nano $HADOOP_HOME/etc/hadoop/mapred-site.xml
Replace the existing configuration with:
<configuration>
<property>
<name>mapreduce.framework.name</name>
<value>yarn</value>
<description>The runtime framework for MapReduce.</description>
</property>

<property>
<name>yarn.app.mapreduce.am.env</name>
<value>HADOOP_MAPRED_HOME=/usr/local/hadoop</value>
</property>

<property>
<name>mapreduce.map.env</name>
<value>HADOOP_MAPRED_HOME=/usr/local/hadoop</value>
</property>

<property>
<name>mapreduce.reduce.env</name>
<value>HADOOP_MAPRED_HOME=/usr/local/hadoop</value>
</property>
</configuration>
This enables MapReduce jobs to run on YARN.
Configure yarn-site.xml
Open:
nano $HADOOP_HOME/etc/hadoop/yarn-site.xml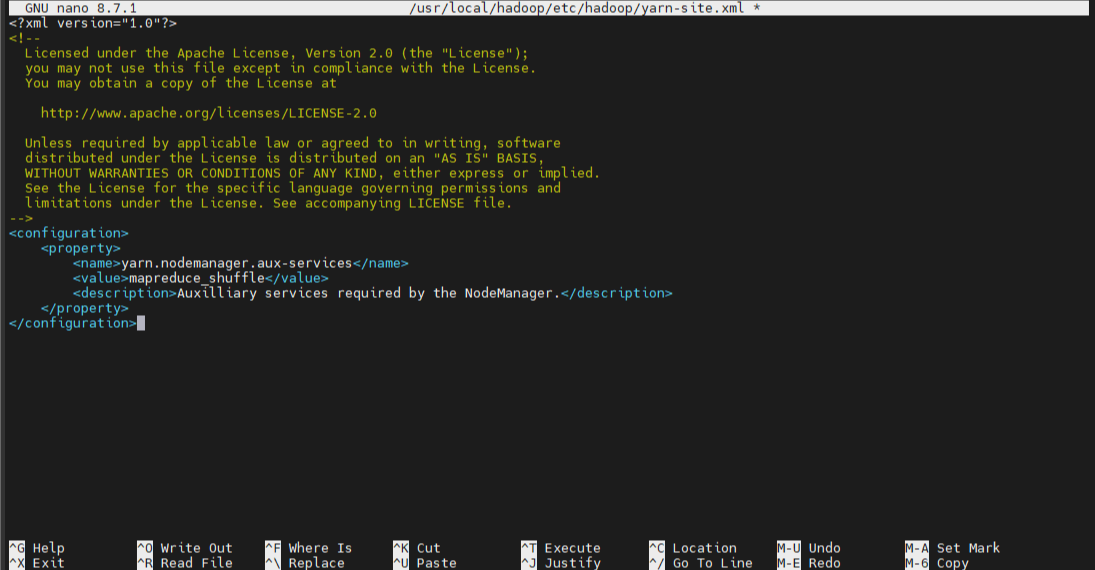
Add:
<configuration>
<property>
<name>yarn.nodemanager.aux-services</name>
<value>mapreduce_shuffle</value>
<description>Required shuffle service for MapReduce.</description>
</property>
</configuration>
The shuffle service is required to execute MapReduce workloads through YARN.
Step 8: Format the HDFS NameNode
Before HDFS can be used, the NameNode must be initialized.
Run:
hdfs namenode -format
This command creates the filesystem metadata structures defined in your Hadoop configuration.
Warning: Run this command only during the initial setup. Reformatting an existing NameNode will erase HDFS metadata and stored data.
After completion, look for messages indicating the NameNode was successfully formatted.
Step 9: Start Hadoop Services
Once configuration is complete, start the Hadoop daemons.
Start HDFS services:
start-dfs.sh
This starts:
NameNode
DataNode
SecondaryNameNode
Next, start YARN:
start-yarn.sh
This starts:
ResourceManager
NodeManager
After both commands finish, your Hadoop environment should be operational.
Step 10: Verify Hadoop Processes
Use the Java Process Status tool to check running Hadoop services:
jps
You should see Hadoop processes such as:
NameNode
DataNode
SecondaryNameNode
ResourceManager
NodeManager
Seeing these services confirms Hadoop started successfully.
Step 11: Access the Hadoop Web Interfaces
Hadoop includes web-based dashboards that make it easy to monitor HDFS and YARN.
Local Installation
If Hadoop is running on your local machine:
HDFS NameNode UI
http://localhost:9870YARN ResourceManager UI
http://localhost:8088
Remote Server Installation
Replace localhost with the server’s public IP address:
HDFS NameNode UI
http://<server-ip>:9870YARN ResourceManager UI
http://<server-ip>:8088
These dashboards allow you to view:
- Cluster health
- Storage information
- Connected nodes
- Running applications
- YARN jobs
Step 12: Stop Hadoop Services
When you’re finished, shut down Hadoop services cleanly.
Stop YARN:
stop-yarn.sh
Stop HDFS:
stop-dfs.sh
Verify the services have stopped:
jps
You should only see the Jps process remaining.
Conclusion
You have successfully installed Apache Hadoop on Ubuntu in pseudo-distributed mode. The setup includes HDFS for storage, YARN for resource management, and MapReduce for data processing, all running on a single machine.
This environment is ideal for learning Hadoop fundamentals, testing configurations, and running small-scale big data workloads before moving to a multi-node production cluster. Once you’re comfortable with the basics, you can begin exploring HDFS operations, MapReduce jobs, and YARN application management in greater depth.