

When you’re troubleshooting network connectivity, one of the first things you’ll want to know is whether a specific port is reachable. Whether you’re checking an SSH server, verifying a web service, or diagnosing firewall issues, Linux provides several built-in and third-party tools for testing TCP and UDP ports.
In this guide, you’ll learn how to test ports using Netcat (nc), Bash /dev/tcp, Nmap, SS, and Curl. You’ll also learn how to interpret common results such as open, closed, refused, filtered, and timed out.
Prerequisites
- A Linux system (Ubuntu, Debian, RHEL, Rocky Linux, or similar)
- Network access to the target host
- Sudo privileges for installing packages or viewing certain network information
Method 1: Test a Remote TCP Port with Netcat (nc)
Netcat (nc) is one of the most popular tools for testing whether a TCP port is accepting connections. It’s often considered the modern replacement for using Telnet as a quick connectivity test.
Install Netcat
For Ubuntu and Debian:
sudo apt install netcat-openbsd
For RHEL and Rocky Linux:
sudo dnf install nmap-ncatNote: sudo is required because package managers need elevated privileges to install software.
Test a TCP Port
Run the following command:
nc -zv 192.168.1.50 22
What the options mean
- nc starts Netcat.
- -z checks the port without sending application data.
- -v enables verbose output.
- 192.168.1.50 is the target host.
- 22 is the port being tested.
If the connection succeeds, you’ll see output similar to:
Connection to 192.168.1.50 22 port [tcp/ssh] succeeded!
A successful result means the target system accepted the TCP connection and a service is likely listening on that port.
Understanding Common Netcat Results
Connection Refused
nc -zv 192.168.1.50 8080
Output:
nc: connect to 192.168.1.50 port 8080 (tcp) failed: Connection refused
This usually means:
- The host is reachable.
- No service is listening on the port.
- A device or firewall actively rejected the connection.
Connection Timed Out
nc: connect to 192.168.1.50 port 8080 (tcp) timed out
A timeout typically indicates:
No response was received.
A firewall may be silently dropping packets.
Routing or network connectivity problems exist.
The host may be unreachable.
Important: A successful TCP connection only confirms that something accepted the connection. It does not verify that the application itself is working correctly. For web services, use tools such as curl to validate the application response.
Set a Custom Timeout
Some filtered ports may take a long time to fail. Use the -w option to define your own timeout period.
nc -zvw 3 192.168.1.50 3306
Here, Netcat waits up to 3 seconds before giving up. This is especially useful when testing multiple ports or hosts and you want predictable response times.
Tip: If certain options are not recognized, check your installed version with:
nc -hDifferent Netcat implementations may support slightly different options.
Method 2: Test a TCP Port Using Bash and /dev/tcp
If you cannot install additional packages, Bash provides a built-in TCP testing method through /dev/tcp. This approach requires no extra software and is useful on restricted servers.
Run the Test
timeout 3 bash -c "echo > /dev/tcp/192.168.1.50/22" && echo "Port open" || echo "Port closed"
Successful output:
Port open
How It Works
- timeout 3 – Stops the test after three seconds.
- bash -c – Runs the command inside Bash because /dev/tcp is a Bash feature.
- echo > /dev/tcp/192.168.1.50/22 – Attempts a TCP connection to the target host and port.
- && echo “Port open” – Runs when the connection succeeds.
- || echo “Port closed” – Runs when the connection fails.
Limitations of /dev/tcp
Before relying on this method, keep these limitations in mind:
1. Bash-Specific Feature
The feature does not work in all shells. For example, on many Debian and Ubuntu systems: /bin/sh points to dash, not bash.
2. Not Available in Every Bash Build
Some hardened environments disable network redirection support.
Recommendation: Use Netcat whenever possible. It provides better diagnostics and supports UDP testing.
Method 3: Scan Multiple Ports with Nmap
When checking several ports or investigating firewall issues, Nmap is often the best choice.
Install Nmap
Ubuntu and Debian
sudo apt install nmap
RHEL and Rocky Linux
sudo dnf install nmapScan Specific Ports
nmap -p 22,80,443,3306 192.168.1.50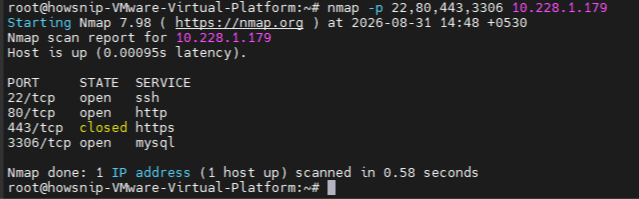
Nmap Port States
- Open – 22/tcp open ssh (A service is accepting connections.)
- Closed – 443/tcp closed https (The host is reachable, but no application is listening on that port.)
- Filtered – 3306/tcp filtered mysql (Traffic filtering prevents Nmap from determining the port status.)
Tip: If a port appears as filtered, don’t immediately restart the service. The application may be running correctly while network controls prevent access.
Scan a Range of Ports
To scan ports 1 through 1000:
nmap -p 1-1000 192.168.1.50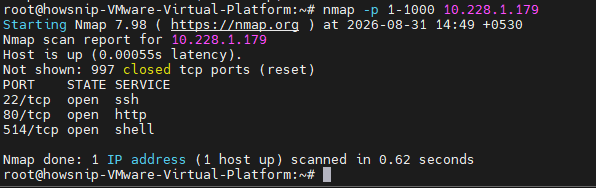
This provides a broader view of available services on the host.
Method 4: Check Open Ports on the Local System with SS
When you’re logged directly into the server, the ss command shows which services are actively listening.
ss is the modern replacement for netstat on most Linux distributions.
View Listening Ports
sudo ss -tulnp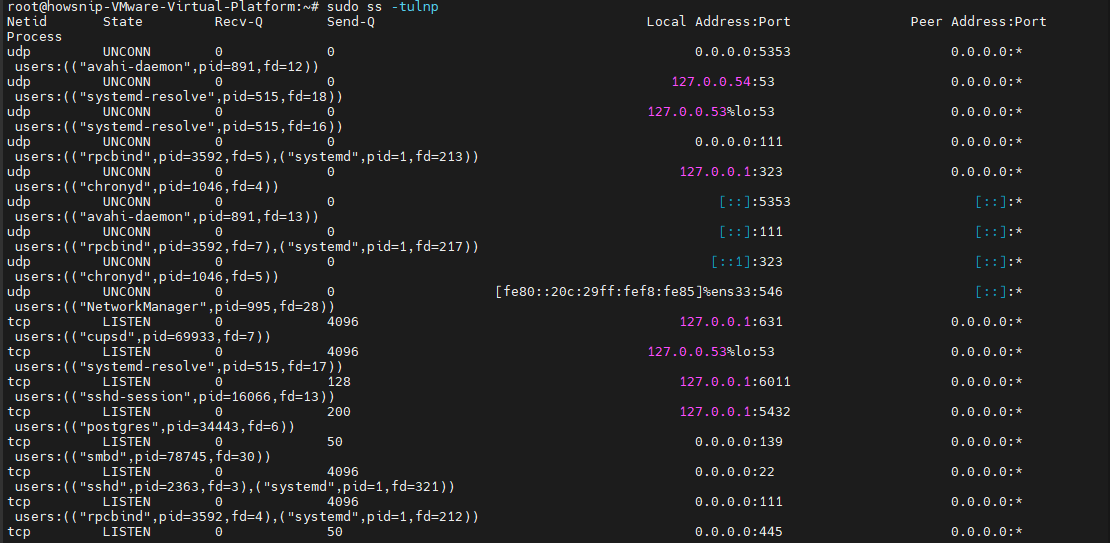
Here,
- -t = TCP sockets
- -u = UDP sockets
- -l = listening sockets only
- -n = numeric addresses and ports
- -p = process information
Check a Single Port
Instead of reviewing the full output, filter for a specific port:
sudo ss -tulnp | grep :3306
This quickly answers two important troubleshooting questions:
- Is the service listening?
- Which process owns the port?
Method 5: Test a Port with Curl
Although Curl is primarily used for HTTP and HTTPS requests, it can also test raw TCP connectivity using its Telnet protocol handler.
Test a TCP Port
curl -v telnet://192.168.1.50:22 --connect-timeout 3
Example output:
* Trying 192.168.1.50:22…
* Connected to 192.168.1.50 (192.168.1.50) port 22
SSH-2.0-OpenSSH_9.9
This is useful because you may see a service banner that helps identify the responding application.
Verify Telnet Support
Not every Curl build includes the Telnet protocol.
Check supported protocols:
curl --version
Review the Protocols section in the output. If telnet is missing, use another method such as Netcat.
Test HTTP and HTTPS Services Directly
For web services, use Curl to test the application itself:
curl -sv --connect-timeout 3 http://192.168.1.50:80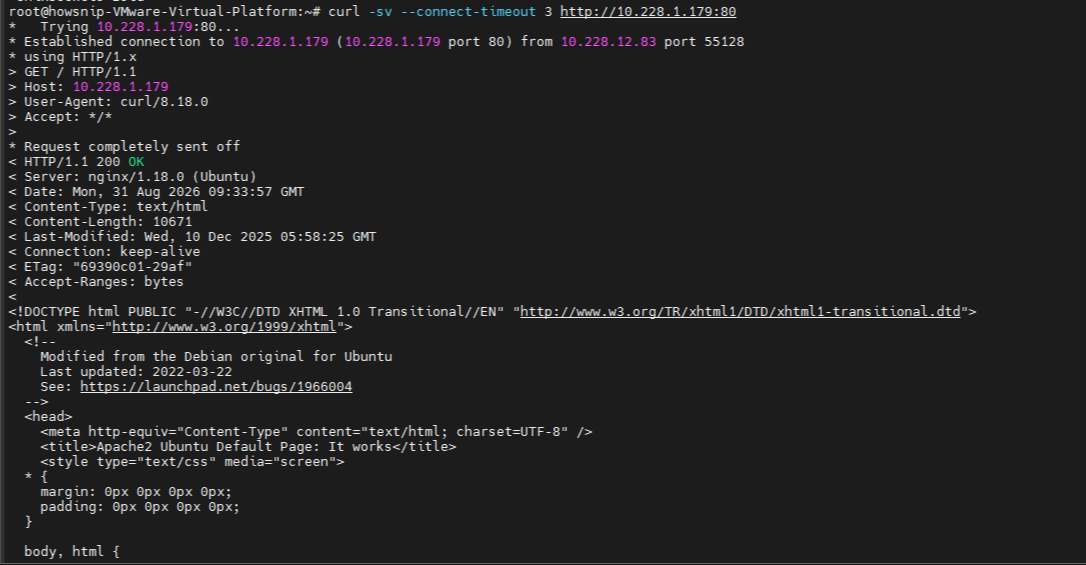
This verifies both:
- TCP connectivity
- HTTP service responsiveness
This provides more meaningful results than a simple port-open test.
Testing UDP Ports
UDP behaves differently from TCP because it does not establish a connection before sending data. As a result, a lack of response does not always indicate a problem.
Scan a UDP Port with Nmap
sudo nmap -sU -p 53 192.168.1.50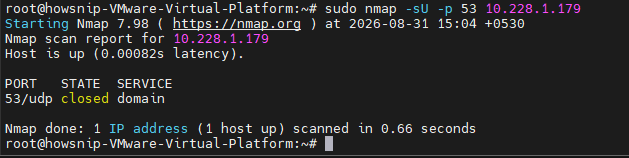
Nmap cannot determine whether:
- A UDP service is listening but not responding.
- A firewall silently dropped the probe packet.
This ambiguity is normal when scanning UDP ports.
Verify UDP Services on the Server
If you have access to the target machine, check the listening UDP sockets directly:
sudo ss -ulnp
This confirms a process is actively bound to UDP port 53.
When a Port Works Locally but Not Remotely
A common troubleshooting scenario looks like this:
- The service is running.
- ss shows it is listening.
- Remote connections still fail.
In many cases, the next thing to check is the firewall.
Ubuntu and Debian
sudo ufw status verbose
RHEL and Rocky Linux
sudo firewall-cmd --list-allReview the allowed ports and services.
If the target port is not permitted through the firewall, remote clients may see:
- Connection timeouts
- Filtered Nmap results
- Failed Netcat tests
Conclusion
Testing ports on Linux is straightforward once you know which tool fits the situation. For UDP troubleshooting, remember that scans are often less definitive than TCP tests.
When possible, verify UDP listeners directly on the server using ss -ulnp. By combining these tools, you can quickly determine whether a problem originates from the application, the network, or the firewall.