

A self-signed SSL certificate is useful for development environments, internal applications, testing, and private services where obtaining a certificate from a public Certificate Authority (CA) is unnecessary.
This guide walks through the complete process of creating a self-signed SSL certificate using OpenSSL. It covers installing OpenSSL, creating a private CA, generating a Certificate Signing Request (CSR), configuring certificate extensions, and signing a server certificate.
OpenSSL Installation
Most Linux distributions already include OpenSSL. If it is not installed, you can add it using your package manager.
Debian/Ubuntu
sudo apt install openssl
RHEL 8/9
sudo dnf install opensslVerify the Installation
openssl --version
This command confirms that OpenSSL is installed and available on the system.
1. Create a Certificate Authority (CA)
Before issuing a certificate, you need a Certificate Authority. The CA signs certificates and establishes trust.
Generate the CA Private Key
openssl genrsa -out CA.key 2048
Here,
- genrsa generates an RSA private key.
- -out defines the output filename.
- 2048 specifies the key length in bits. Larger key sizes generally provide stronger security.
Create the CA Certificate
Once the private key is available, generate the root CA certificate:
openssl req -x509 -new -key CA.key -out CA.pem -days 365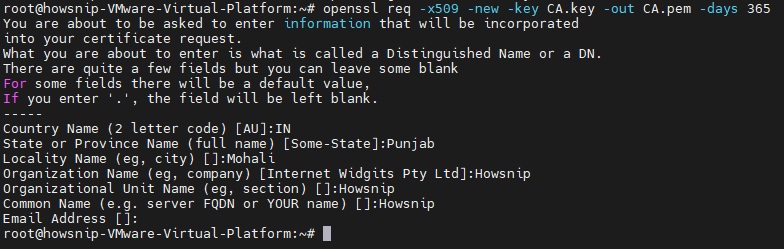 Where,
- req starts the certificate request process.
- -x509 instructs OpenSSL to create a self-signed X.509 certificate instead of a CSR.
- -new creates a new certificate.
- -key specifies the private key to use.
- -out defines the certificate filename.
- -days determines how long the certificate remains valid.
During execution, OpenSSL prompts for certificate details such as:
- Country Name
- State or Province
- Locality
- Organization Name
- Organizational Unit
- Common Name
- Email Address
Alternative Method
You can generate the certificate and private key together by using the -keyout option instead of referencing an existing key with -key.
Trust the CA on Your System
After creating the CA certificate, add it to the system’s trusted certificate store.
Debian/Ubuntu
sudo cp CA.pem /usr/local/share/ca-certificates/CA.pem
sudo update-ca-certificates
RHEL
sudo cp CA.pem /etc/pki/ca-trust/source/anchors/CA.pem
sudo update-ca-trust
Store the Private Key Securely
It is generally recommended to keep CA private keys in protected system locations.
Debian/Ubuntu
/etc/ssl/private/RHEL
/etc/pki/CA/private/Updating the trust store allows the operating system to recognize certificates issued by your local CA.
2. Generate a Certificate Signing Request (CSR)
A CSR contains the public key and identifying information needed to request a certificate from a CA.
Generate the Server Private Key
openssl genrsa -out server.key 2048
Create the CSR
openssl req -new -key server.key -out server.csr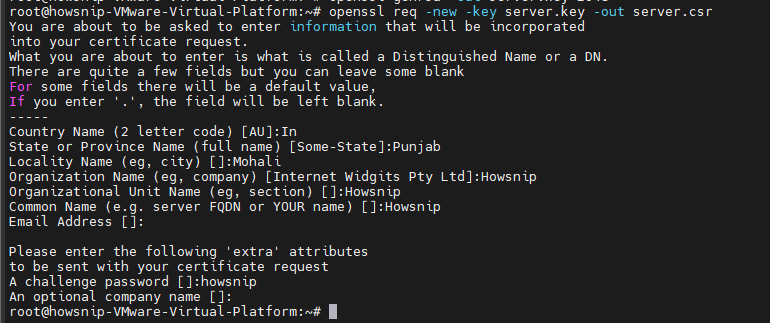
The req -new combination creates a Certificate Signing Request. If the -x509 option is added instead, OpenSSL generates a self-signed certificate rather than a CSR.
3. Create a Certificate Extension File
Although optional, using a certificate extension file is highly recommended because it allows you to define certificate capabilities and alternate identities.
Create a file named:
nano server.ext
Add the following content:
[ v3_req ]
authorityKeyIdentifier = keyid,issuer
basicConstraints = CA:FALSE
keyUsage = digitalSignature, nonRepudiation, keyEncipherment, dataEncipherment
extendedKeyUsage = serverAuth, clientAuth
subjectAltName = @alt_names

[ alt_names ]
DNS.1 = localhost
IP.1 = 127.0.0.1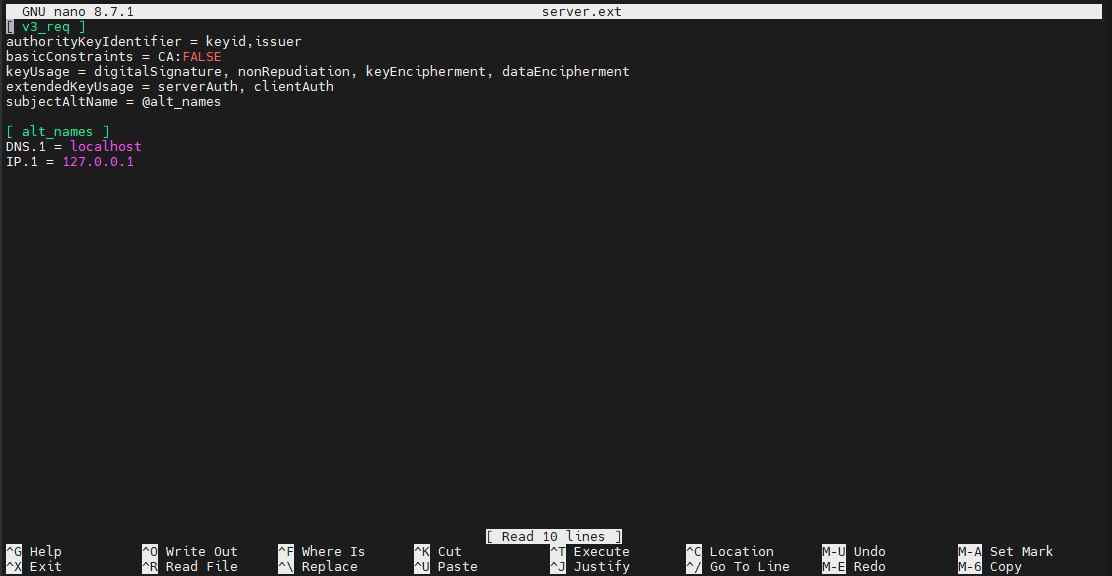
Here,
- authorityKeyIdentifier – Links the certificate to the issuing CA through the issuer identity and key identifier. This helps certificate chain validation.
- basicConstraints – Determines whether the certificate can function as a Certificate Authority. Examples:
- CA:FALSE The certificate cannot sign other certificates.
- CA:TRUE The certificate can be used as a CA. You can also define a chain depth limit using:
- pathlen:<number>
- keyUsage – Specifies the cryptographic operations permitted for the certificate’s public key.
Common values include:
- digitalSignature – Allows digital signing operations such as TLS handshakes.
- nonRepudiation – Helps prevent a signer from denying a signature.
- keyEncipherment – Enables encryption of keys used during TLS communication.
- dataEncipherment – Permits direct encryption of data.
- keyAgreement – Supports key exchange mechanisms such as Diffie-Hellman.
- keyCertSign – Required for CA certificates that sign other certificates.
- cRLSign – Allows signing Certificate Revocation Lists (CRLs).
- encipherOnly – Restricts key-agreement operations to encryption only.
- decipherOnly – Restricts key-agreement operations to decryption only.
- extendedKeyUsage – Provides more specific usage definitions.
Common values include:
- serverAuth – Authenticates SSL/TLS servers such as HTTPS websites.
- clientAuth – Authenticates clients during TLS connections.
- codeSigning – Used for signing software and executable code.
- emailProtection – Supports email encryption and digital signatures.
- timeStamping – Used for trusted timestamp services.
- OCSPSigning – Signs Online Certificate Status Protocol (OCSP) responses.
- subjectAltName – Specifies alternative identities for the certificate.
Examples include:
- DNS names
- IP addresses
- Email addresses
Modern browsers and clients commonly rely on Subject Alternative Names (SANs) when validating certificates.
4. Sign the CSR and Generate the Server Certificate
With the CA, private key, CSR, and extension file ready, you can create the final server certificate.
openssl x509 -req \
-in /root/server.csr \
-CA /root/CA.pem \
-CAkey /root/CA.key \
-CAcreateserial \
-out /root/server.pem \
-days 365 \
-sha256 \
-extfile /root/server.ext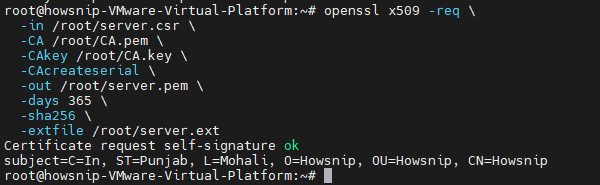
Here,
- x509 – Creates an X.509 certificate.
- -req – Indicates that the input file is a CSR.
- -in – Specifies the CSR file to process.
- –CA – Identifies the CA certificate used to sign the request.
- -CAkey – Points to the CA’s private key used for digital signing.
- -CAcreateserial – Creates a serial number file (such as .srl) to track issued certificates.
- -out – Defines the name of the resulting certificate file.
- -days – Sets the certificate validity period.
- -sha256 – Uses the SHA-256 algorithm when signing the certificate.
- -extfile – Applies the extension settings from the specified file.
Conclusion
Generating a self-signed SSL certificate with OpenSSL involves more than creating a single certificate.
A complete setup includes building a trusted local Certificate Authority, generating server keys and CSRs, configuring certificate extensions, and signing certificates properly. Following this approach provides a flexible and controlled SSL/TLS environment for development, testing, and internal infrastructure.