
Whether you’re a Linux administrator, DevOps engineer, network engineer, or simply a Linux enthusiast, networking problems are inevitable. Knowing the right command can dramatically reduce troubleshooting time and help you quickly identify connectivity, DNS, routing, firewall, and performance issues.
In this guide, you’ll learn 22 essential Linux networking commands used for network configuration, troubleshooting, monitoring, packet analysis, and firewall management.
- ifconfig
- Display Active Network Interfaces
- Display All Interfaces (Including Inactive Ones)
- Assign an IP Address
- Enable a Network Interface
- Disable a Network Interface
- ip Command
- View IP Configuration
- Assign an IP Address
- Remove an IP Address
- Display Neighbor Table
- ifup, ifdown, and ifquery
- Bring an Interface Up
- Bring an Interface Down
- View Interface Configuration
- ethtool
- Check NIC Details
- ping
- Test Connectivity
- Send Only Four Requests
- traceroute
- Trace Packet Route
- mtr
- Trace and Monitor Network Path
- Run a Limited Number of Tests
- route
- View Routing Table
- Add Default Gateway
- Add a Static Route
- Delete a Route
- nmcli
- View Device Status
- Display All Connections
- Display Active Connections
- netstat
- Show Listening TCP Ports
- Display Routing Table
- ss
- Display Open TCP Connections
- Show Active Connections with Timers
- nc (Netcat)
- Scan Specific Ports
- Scan a Range of Ports
- Test Connectivity to a Remote Server
- nmap
- Scan a Host by Name
- Scan a Host by IP Address
- host
- Lookup a Domain
- dig
- Query DNS Records
- nslookup
- Lookup a Domain
- Reverse DNS Lookup
- tcpdump
- Capture Traffic from an Interface
- Capture a Limited Number of Packets
- Save Packets to a File
- Wireshark
- bmon
- Launch bmon
- iptables
- View Existing Rules
- firewalld
- Check Firewall Status
- List Active Zones
- UFW (Uncomplicated Firewall)
- Check Firewall Status
- Enable UFW
- Disable UFW
1. ifconfig
The ifconfig command is one of the classic Linux networking tools used to configure and display network interface information. Administrators commonly use it to view IP addresses, MAC addresses, interface status, and MTU settings.
Display Active Network Interfaces
The ifconfig command is used to display the configuration and status of currently active network interfaces. The output provides information such as the interface name, IP address, subnet mask, broadcast address, MAC address, and packet statistics.
ifconfig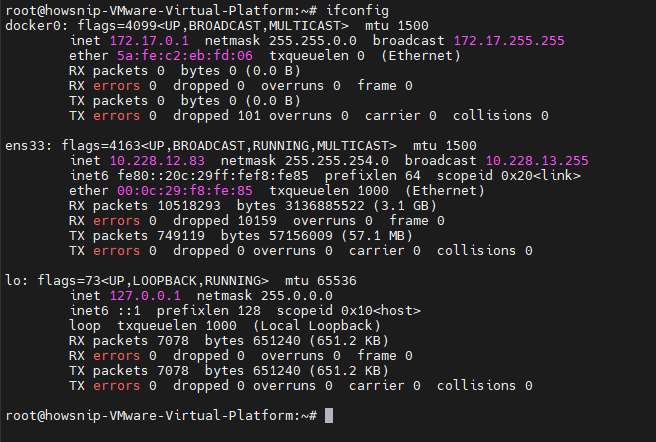
Display All Interfaces (Including Inactive Ones)
The ifconfig -a command displays information about all network interfaces, including interfaces that are currently disabled or inactive. This is useful when you want to identify an interface that does not appear in the normal ifconfig output.
ifconfig -a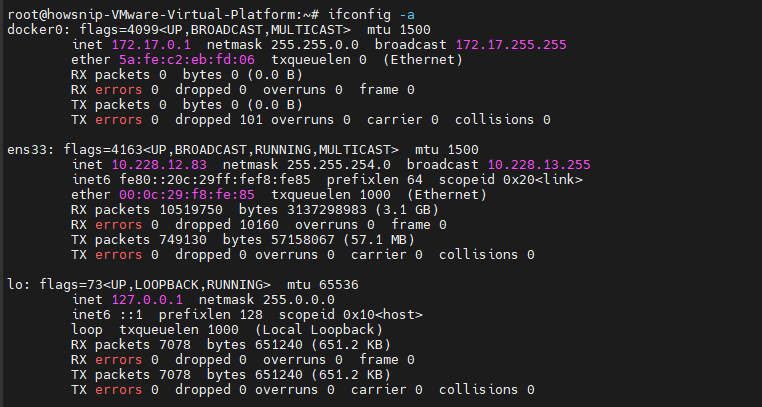
Assign an IP Address
The sudo ifconfig <interface> <ip> netmask <netmask> command assigns the IP address and the subnet mask to the network interface. The sudo command is required because changing network configuration generally requires administrative privileges.
sudo ifconfig <interface> <ip> netmask <netmask>
Enable a Network Interface
The sudo ifconfig <interface> up command is used to enable the network interface. Once enabled, the interface can be used to send and receive network traffic.
sudo ifconfig <interface> up
Disable a Network Interface
The sudo ifconfig <interface> down command disables the network interface. After running this command, the interface will no longer be available for normal network communication until it is enabled again.
sudo ifconfig <interface> downNote: ifconfig is deprecated on modern Linux distributions. The recommended replacement is the ip command.
2. ip Command
The ip command is the modern replacement for ifconfig, route, and several other networking utilities. It provides more functionality and flexibility for managing network interfaces, routes, and addresses.
View IP Configuration
The ip addr show command displays detailed IP addressing information for the network interfaces available on the system. It shows interface names, IPv4 and IPv6 addresses, subnet prefixes, interface states, and other related information.
ip addr show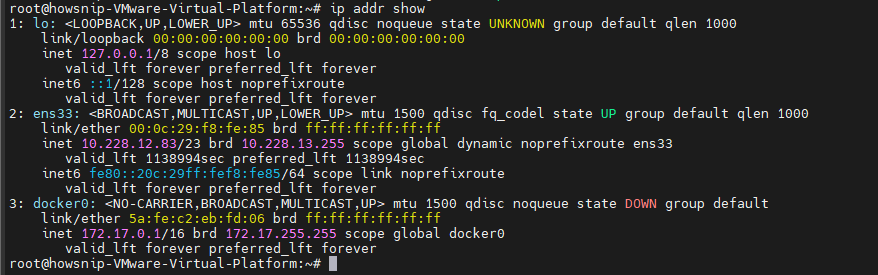
Assign an IP Address
The sudo ip addr add <ip> dev <interface> command adds the IP address to the network interface. Unlike assigning an address using the older ifconfig command, the ip command is part of the modern Linux networking utilities.
sudo ip addr add <ip> dev <interface>
Remove an IP Address
The sudo ip addr del <ip/subnet> dev <interface> command removes the specified IP address from the interface.
sudo ip addr del <ip/subnet> dev <interface>
Here, /23 represents the CIDR subnet prefix associated with the IP address.
Display Neighbor Table
The ip neigh command displays the neighbor table maintained by the Linux networking stack. It can show information about nearby devices, including their IP addresses, MAC addresses, and the current state of the neighbor entry.
ip neigh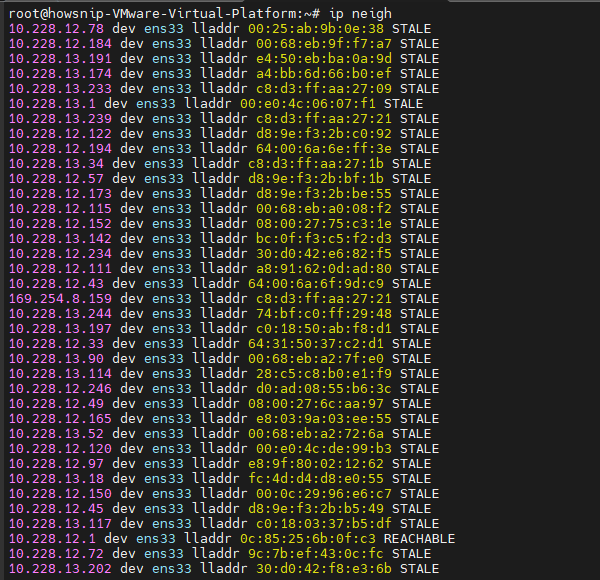
3. ifup, ifdown, and ifquery
These commands simplify network interface management.
Bring an Interface Up
The sudo ifup <interface> command activates the network interface using the network configuration available on the system. It is commonly used on systems that use traditional interface configuration files.
sudo ifup <interface>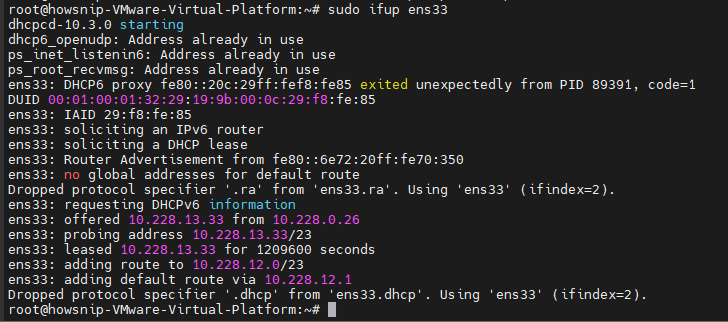
Bring an Interface Down
The sudo ifdown <interface> command deactivates the network interface. This stops the interface from being used for network communication until it is brought up again.
sudo ifdown <interface>
View Interface Configuration
The sudo ifquery <interface> command checks and displays the configured network settings for the interface. It is useful on systems using the traditional ifup/ifdown networking configuration.
sudo ifquery <interface>
4. ethtool
ethtool is used to display and modify network interface card (NIC) settings such as speed, duplex mode, and driver information.
Check NIC Details
The sudo ethtool <interface> command displays detailed information about the network interface. Depending on the hardware and driver, the output can include link status, supported speeds, duplex mode, auto-negotiation, and other NIC capabilities.
sudo ethtool <interface>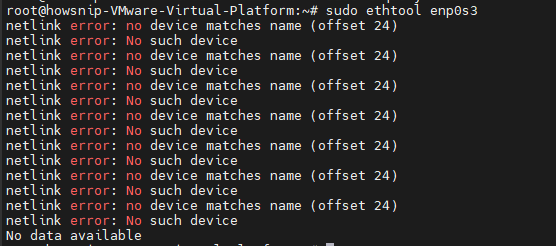
5. ping
The ping utility verifies connectivity between systems using ICMP packets. It is often the first command used during network troubleshooting.
Test Connectivity
The ping <ip> command is used to test whether the specified host is reachable over the network. It sends ICMP echo requests to the destination and displays the replies along with the response time.
ping <ip>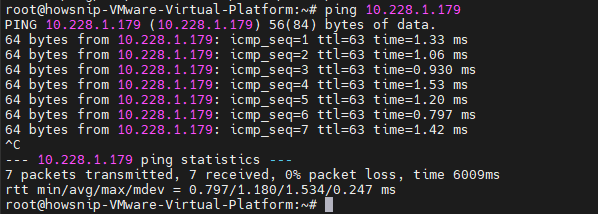
Send Only Four Requests
The ping -c 4 <ip> command performs a limited connectivity test by sending exactly four ICMP echo requests to the specified IP address. After four requests, the command automatically stops and displays the packet transmission and response statistics.
ping -c 4 <ip>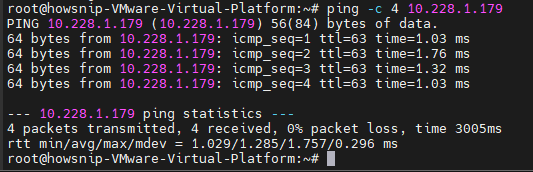
6. traceroute
traceroute displays the path packets take from your machine to a destination host, helping identify routing issues and latency problems.
Trace Packet Route
The traceroute <ip> command is used to identify the network path taken by packets from the local system to the specified destination. It displays the intermediate routers, or hops, encountered along the way and can help identify where connectivity or latency problems are occurring.
traceroute <ip>
7. mtr
mtr combines the functionality of ping and traceroute into a powerful real-time diagnostic tool.
Trace and Monitor Network Path
The mtr <domain> or mtr <ip> command combines the functionality of ping and traceroute. It continuously monitors the path between the local system and the destination while displaying information such as packet loss and latency for individual network hops.
mtr <domain>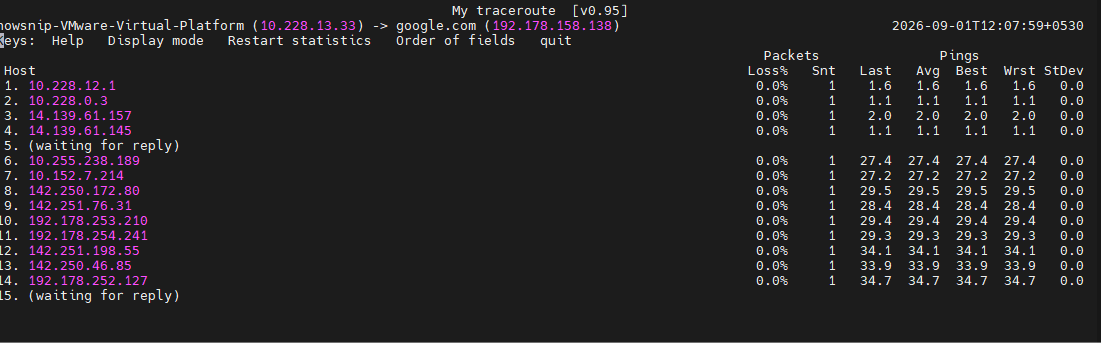
Or:
mtr <ip>
Run a Limited Number of Tests
The mtr -c 4 <domain> command runs MTR for a limited number of cycles instead of continuously monitoring the destination. In this example, four test cycles are performed before the command displays the final results.
mtr -c 4 <domain>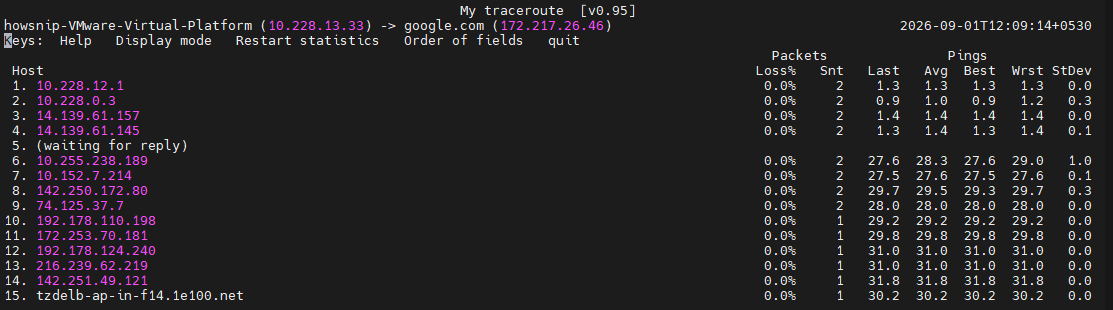
8. route
The route command displays and modifies the Linux kernel routing table.
View Routing Table
The route command displays the system’s current IP routing table. The routing table determines where network packets should be forwarded and includes information such as destination networks, gateways, network interfaces, and routing metrics.
route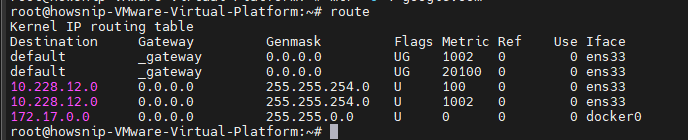
Add Default Gateway
The sudo route add default gw <gateway-ip> command adds a default gateway to the system’s routing table. The default gateway is used when the system does not have a more specific route for the destination network.
sudo route add default gw <gateway-ip>
Add a Static Route
The sudo route add -net <network-ip/cidr> gw <gateway-ip> <interface> command adds a static route for a specific network. It tells the system to forward traffic for the specified network through the given gateway and network interface.
sudo route add -net <network-ip/cidr> gw <gateway-ip> <interface>
Delete a Route
The sudo route del -net <network-ip/cidr> command removes a specific network route from the routing table. This can be useful when a previously configured static route is no longer required.
sudo route del -net <network-ip/cidr>
9. nmcli
nmcli is the command-line interface for NetworkManager and provides powerful network management features.
View Device Status
The nmcli dev status command displays the current status of network devices managed by NetworkManager. It shows information such as the device name, device type, and whether the interface is connected, disconnected, or unavailable.
nmcli dev status
Display All Connections
The nmcli con show command lists all network connection profiles configured through NetworkManager. These profiles contain settings that can be used to establish network connections.
nmcli con show
Display Active Connections
The nmcli con show -a command displays only the network connections that are currently active. This makes it easier to identify which configured connections are currently being used.
nmcli con show -a
10. netstat
netstat displays network connections, listening ports, routing tables, and network statistics.
Show Listening TCP Ports
The sudo netstat -tnlp command displays TCP ports that are currently listening for incoming connections. It also shows the associated process information, including the PID and program name. This command is particularly useful for identifying services that are listening on network ports.
sudo netstat -tnlp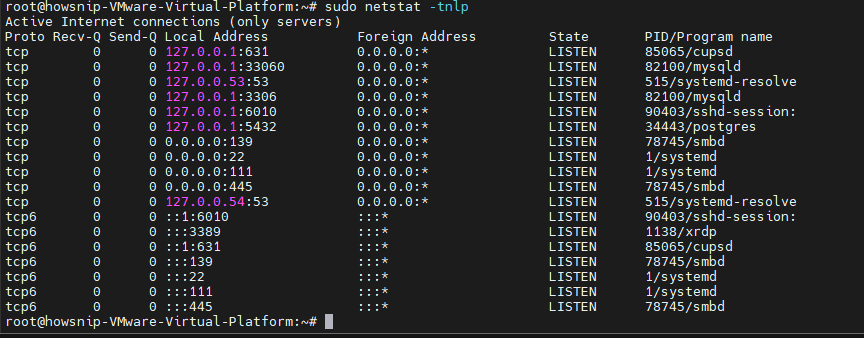
Display Routing Table
The netstat -r command displays the system’s routing table. It provides information about destination networks, gateways, interfaces, and routing metrics that determine how packets are forwarded.
netstat -r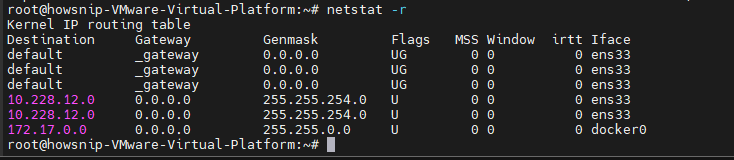
Note: netstat is deprecated on many modern Linux systems. The recommended replacement is ss.
11. ss
The ss command provides detailed socket statistics and is faster than netstat.
Display Open TCP Connections
The ss -ta command displays TCP sockets, including both listening and established connections. It is useful for checking current TCP connections and understanding how the system is communicating with other hosts.
ss -ta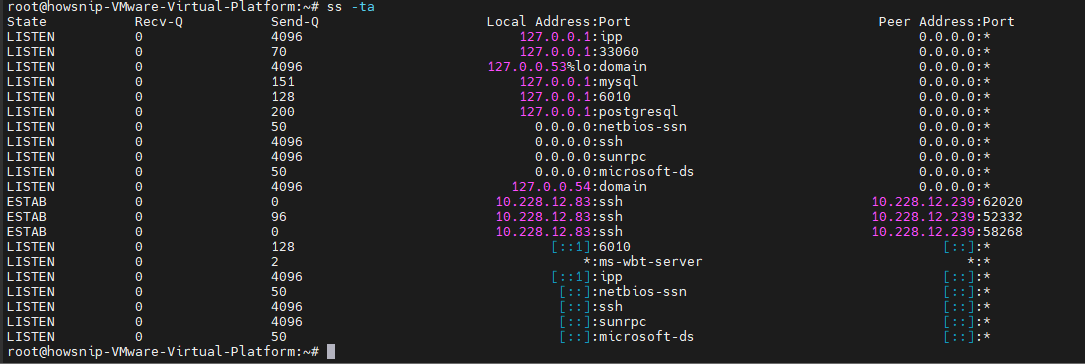
Show Active Connections with Timers
The ss -to command displays TCP connections along with their timer information. This can help when troubleshooting TCP connections, timeouts, retransmissions, and connection states.
ss -to
12. nc (Netcat)
Often called the “Swiss Army Knife of Networking,” Netcat can test connectivity, scan ports, transfer files, and troubleshoot services.
Scan Specific Ports
The nc -zv <domain/ip> <port1> <port2> <port3> command uses Netcat to check whether the specified TCP ports are accessible on the target server. The -z option performs a connection check without sending application data, while -v provides detailed output.
nc -zv <domain/ip> <port1> <port2> <port3>
Scan a Range of Ports
The nc -zv <domain/ip> <port-range> command checks a range of TCP ports on the specified server. This can be used to quickly determine which ports within the range are accepting connections.
nc -zv <domain/ip> <port-range>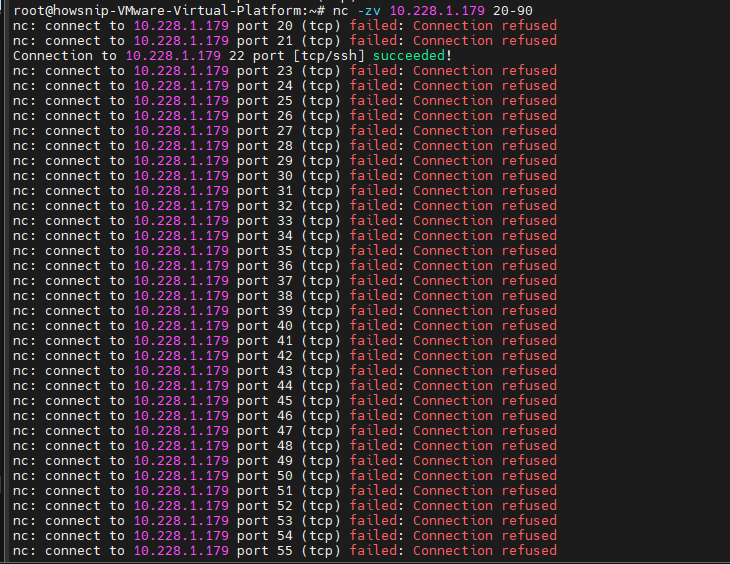
Test Connectivity to a Remote Server
The nc -p <localport> -w 10 <domain/ip> <port> command attempts to establish a connection to specified port on the remote server while using local port. The -w 10 option specifies a 10-second timeout for the connection attempt.
nc -p <localport> -w 10 <domain/ip> <port>
13. nmap
nmap is one of the most popular network discovery and security auditing tools.
Scan a Host by Name
The nmap <domain> command scans the specified hostname to identify accessible network ports and, depending on the scan and permissions, information about the services running on those ports.
nmap <domain>
Scan a Host by IP Address
The nmap <ip> command performs a network scan against the specified IP address. It can identify accessible ports and provide information about services that may be running on the target system.
nmap <ip>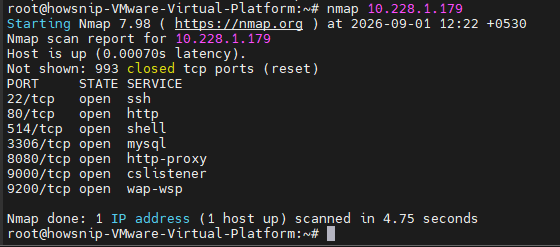
14. host
The host command performs simple DNS lookups and converts hostnames into IP addresses.
Lookup a Domain
The host <domain> command performs a DNS lookup for the specified domain. It can display the IP addresses associated with the domain and other basic DNS information.
host <domain>
15. dig
dig (Domain Information Groper) provides detailed DNS information and is one of the most trusted DNS troubleshooting tools.
Query DNS Records
The dig <domain> command performs a detailed DNS query and displays information returned by the DNS server. It is commonly used by administrators to troubleshoot DNS resolution and examine DNS records.
dig <domain>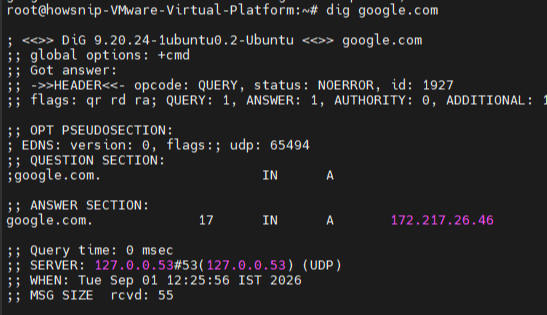
16. nslookup
nslookup is another widely used DNS troubleshooting utility.
Lookup a Domain
The nslookup <domain> command queries a DNS server to find information about the specified domain. It can be used to determine the IP address associated with a hostname and to troubleshoot DNS resolution problems.
nslookup <domain>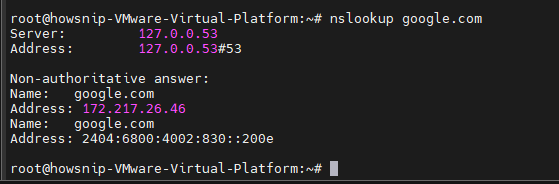
Reverse DNS Lookup
The nslookup <ip> command performs a reverse DNS lookup. Instead of finding an IP address from a domain name, it attempts to find the hostname associated with the specified IP address.
nslookup <ip>
17. tcpdump
tcpdump is a powerful packet-sniffing tool used to capture and analyze network traffic directly from the command line.
Capture Traffic from an Interface
The tcpdump -i <interface> command captures and displays network packets passing through the interface in real time. It is commonly used for network troubleshooting, traffic analysis, and investigating communication between hosts.
tcpdump -i <interface>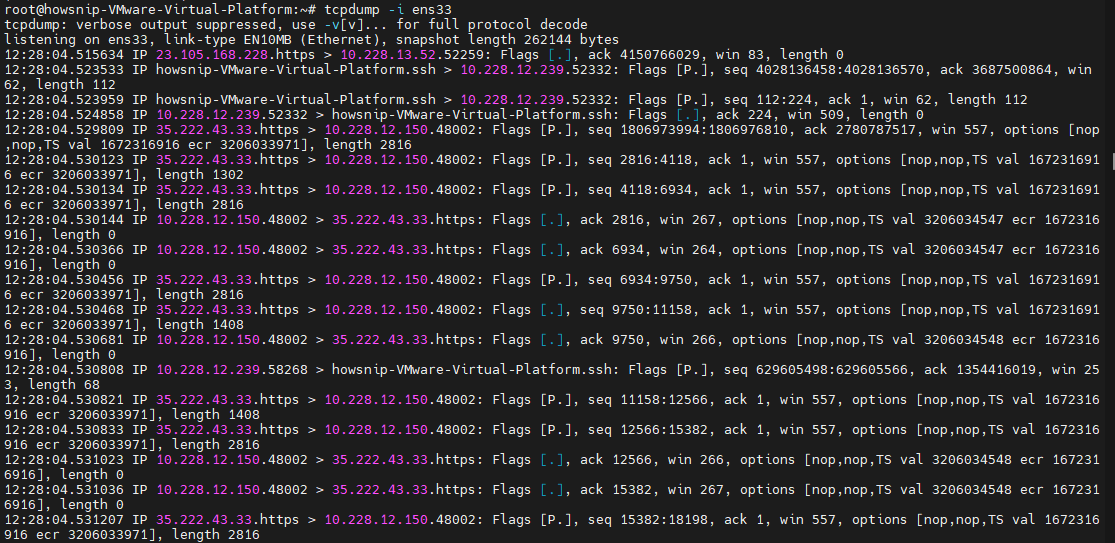
Capture a Limited Number of Packets
The tcpdump -c 5 -i <interface> command captures only five packets from the interface and then automatically stops. The -c 5 option specifies the number of packets to capture.
tcpdump -c 5 -i <interface>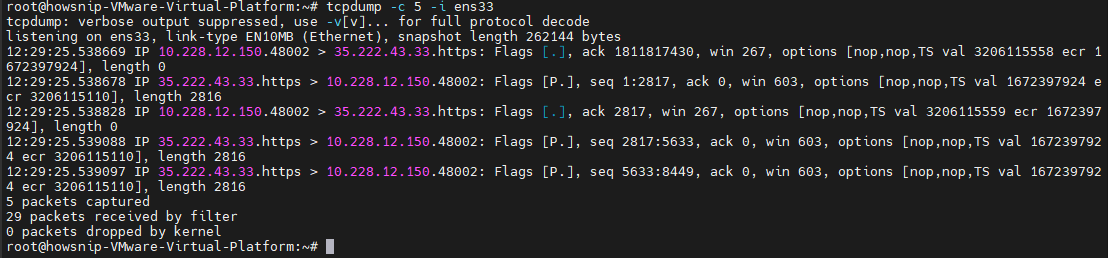
Save Packets to a File
The tcpdump -w captured.pcap -i <interface> command captures network packets from the interface and saves them to a file named captured.pcap. The saved capture can later be opened and analyzed using tools such as Wireshark or another packet-analysis utility.
tcpdump -w captured.pcap -i <interface> 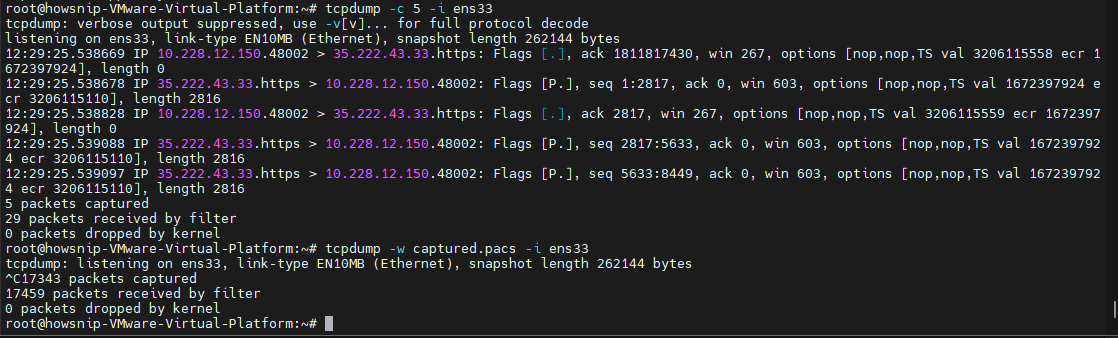
18. Wireshark
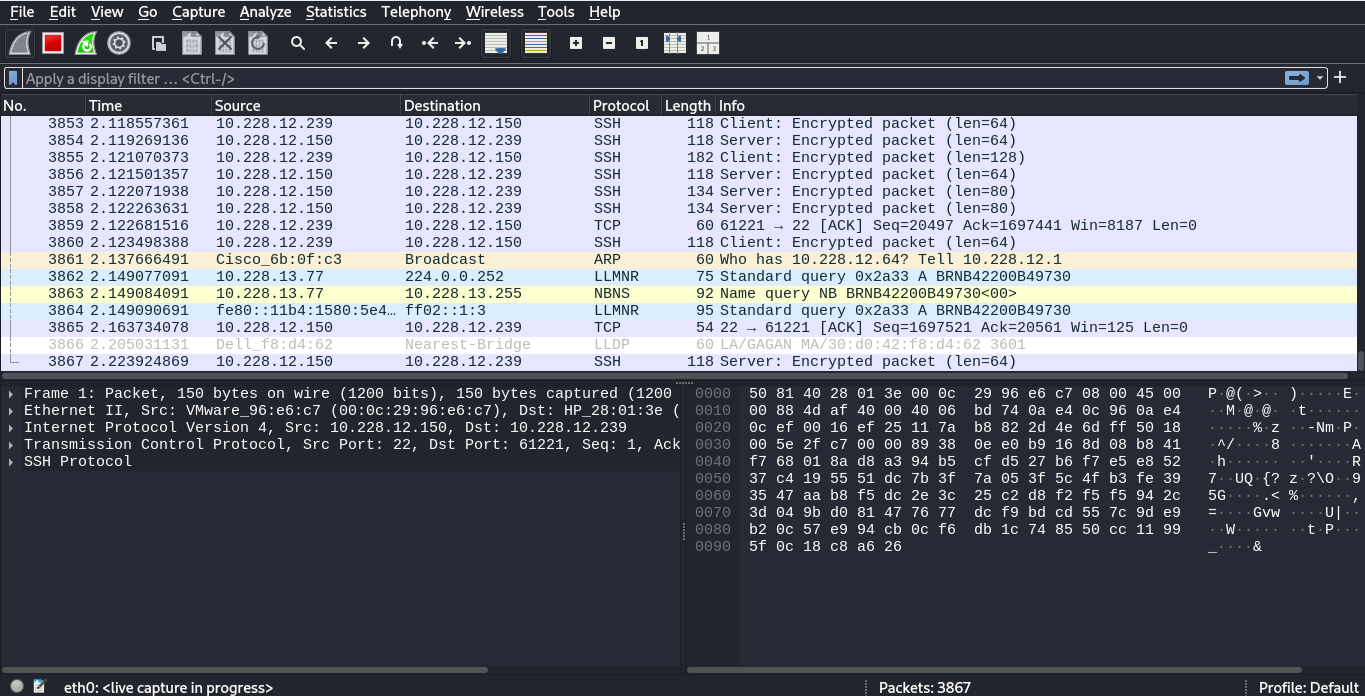
Wireshark is the industry’s most popular graphical packet analyzer. It allows administrators to inspect network traffic in real time and perform deep packet analysis.
19. bmon
bmon is a lightweight bandwidth monitoring and debugging tool that displays real-time network statistics in a user-friendly format.
Launch bmon
The bmon command launches an interactive bandwidth monitoring tool. It provides real-time information about network traffic, including transmitted and received data for available network interfaces.
bmon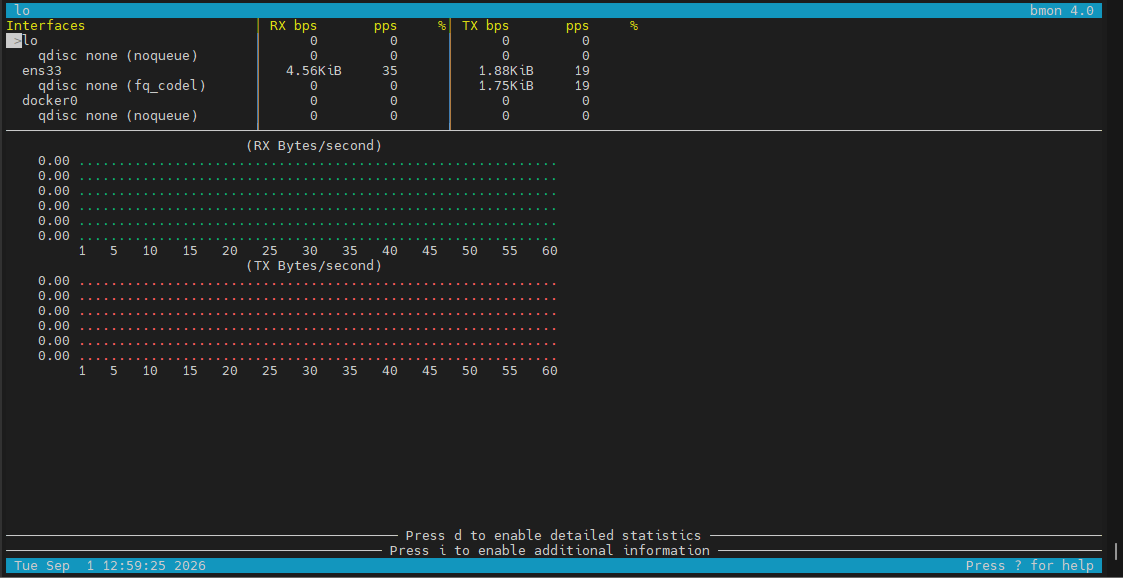
Also Read: 34 Most Useful Linux System Commands You Need To Know
20. iptables
iptables is a command-line utility for configuring Linux firewall rules, packet filtering policies, and NAT settings.
View Existing Rules
The sudo iptables -L command lists the firewall rules currently configured in iptables. The output is organized into chains such as INPUT, OUTPUT, and FORWARD, allowing you to review how network traffic is being filtered.
sudo iptables -L21. firewalld
firewalld is a dynamic firewall management service that simplifies firewall administration through zones and services.
Check Firewall Status
The sudo firewall-cmd –state command checks whether the firewalld firewall service is currently running. A running firewall normally returns running.
sudo firewall-cmd --stateList Active Zones
The sudo firewall-cmd –get-active-zones command displays the currently active firewalld zones and the network interfaces associated with those zones. Zones determine which firewall rules are applied to particular network connections.
sudo firewall-cmd --get-active-zones22. UFW (Uncomplicated Firewall)
UFW provides a simple and user-friendly way to manage firewall rules, particularly on Ubuntu and Debian systems.
Check Firewall Status
The sudo ufw status command displays the current status of the UFW firewall and shows the firewall rules that are currently configured.
sudo ufw status
Enable UFW
The sudo ufw enable command enables the UFW firewall. Once enabled, UFW begins enforcing its configured firewall rules to control incoming and outgoing network traffic.
sudo ufw enable
Disable UFW
The sudo ufw disable command disables the UFW firewall. After disabling it, UFW will no longer actively enforce its configured firewall rules until it is enabled again.
sudo ufw disable
Bonus Tip: Use Man Pages
Nearly every Linux command includes detailed documentation accessible through the man command.
man <command_name>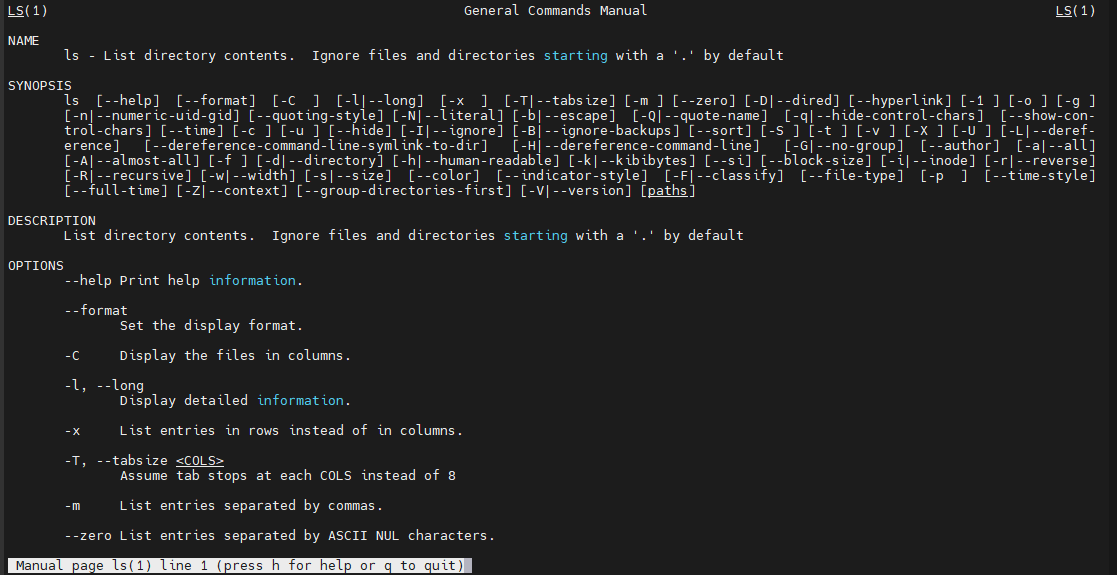
Example:
man pingThis is often the fastest way to learn command options and usage examples directly from your system.
Conclusion
Linux offers a rich collection of networking tools that help administrators configure interfaces, troubleshoot connectivity problems, analyze network traffic, manage DNS, monitor performance, and secure systems with firewalls.
Mastering these 22 essential networking commands will significantly improve your ability to diagnose issues, optimize performance, and maintain reliable Linux infrastructure. With the screenshots you’ve captured for each command, this guide can serve as an excellent reference article for beginners and experienced administrators alike.