
If you run a blog or a directory website, having a comment system can make your content more engaging and trustworthy. Visitors love sharing their opinions or feedback and you can use that interaction to improve your content and SEO.
In this tutorial, we’ll show you how to create a fully functional AJAX-based comment system in PHP and MySQL, complete with form validation, a CAPTCHA security check, and a clean, responsive UI using Bootstrap.
Here’s the basic structure:
/commentsystem/
│
├── config.php
├── save_comment.php
├── form.php
└── style.css
Step 1: Add the HTML Form
This form collects user input (fullname, email, comment) and includes a CAPTCHA field generated using PHP.
<div class="commentform">
  <h4>Leave a comment</h4>
  <hr>
  <form id="commentreviewForm" method="post">
    <div class="row">
      <div class="col-md-6">
        <label>Full Name</label>
        <input type="text" name="fullname" class="form-control" required>
      </div>
      <div class="col-md-6">
        <label>Email Address</label>
        <input type="email" name="email" class="form-control" required>
      </div>
    </div>
    <div class="row">
      <div class="col-md-12">
        <label>Message</label>
        <textarea class="form-control" rows="3" name="message" required></textarea>
      </div>
    </div>
    <div class="row">
      <div class="col-md-12">
        <?php
          $a = rand(1, 9);
          $b = rand(1, 9);
          $_SESSION['captcha_answer'] = $a + $b;
        ?>
        <label>Security Check - What is <?php echo "$a + $b"; ?>?</label>
        <input type="number" name="captcha" class="form-control" required>
      </div>
    </div>
    <input type="submit" class="btn btn-success" value="Submit">
    <div id="responseMessageshow" class="mt-3"></div>
  </form>
</div>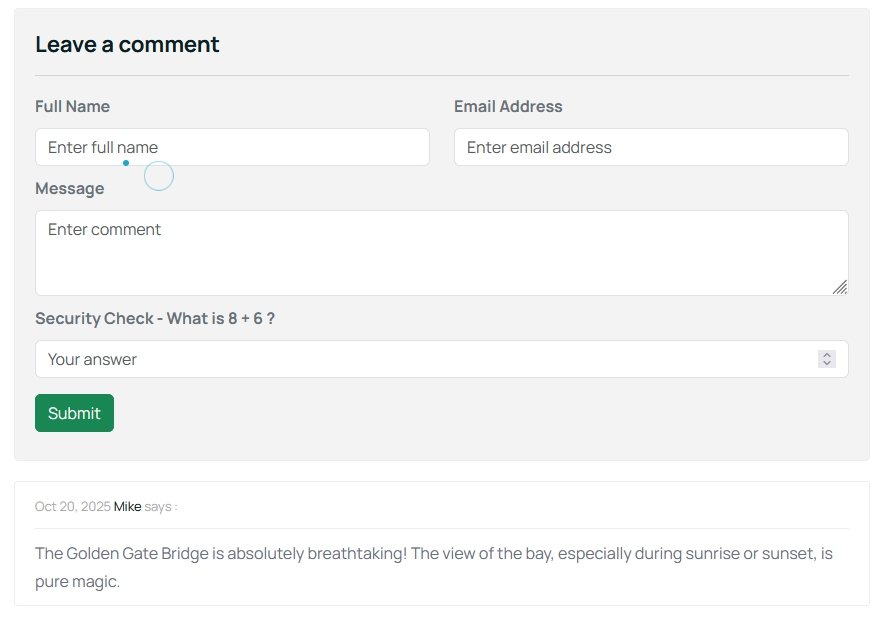
Step 2: Display Approved Comments
Once the comment is approved by an admin, it’s displayed under the post.
<?php
$stmt = $conn->prepare("SELECT fullname, message, datetime FROM placecomments WHERE status='Approved' AND deleted='0' ORDER BY id DESC");
$stmt->execute();
$comments = $stmt->fetchAll(PDO::FETCH_ASSOC);
?>
<div class="blog-comment">
<ul class="comments">
<?php foreach ($comments as $comment): ?>
<li class="clearfix">
<div class="post-comments">
<p class="meta">
<?= date('M d, Y', strtotime($comment['datetime'])) ?>
<a href="#"><?= htmlspecialchars($comment['fullname']) ?></a> says:
</p>
<p><?= nl2br(htmlspecialchars($comment['message'])) ?></p>
</div>
</li>
<?php endforeach; ?>
</ul>
</div>Step 3: Handle Form Submission with AJAX
To keep the experience smooth, we’ll use jQuery AJAX to submit the comment without reloading the page.
<script>
  $("#commentreviewForm").on("submit", function(e) {
    e.preventDefault();
    $.ajax({
      url: "save_comment.php",
      type: "POST",
      data: $(this).serialize(),
      success: function(response) {
        $("#responseMessageshow").html('<div class="alert alert-success">' + response + '</div>');
        $("#commentreviewForm")[0].reset();
      },
      error: function() {
        $("#responseMessageshow").html('<div class="alert alert-danger">Error submitting comment.</div>');
      }
    });
  });
</script>
This AJAX function sends the form data to save_comment.php and shows a success or error message dynamically.
Step 4: The Backend Logic (save_comment.php)
Here’s the server-side PHP script that validates the CAPTCHA and saves the comment.
<?php
  include('config.php');
  session_name('websitesession');
  session_start();
  date_default_timezone_set("Asia/Kolkata");

  if ($_SERVER['REQUEST_METHOD'] == 'POST') {
    if (!isset($_SESSION['captcha_answer']) || $_POST['captcha'] != $_SESSION['captcha_answer']) {
      echo "Incorrect security answer. Please try again.";
    exit;
  }
  unset($_SESSION['captcha_answer']);

  // Collect form data
  $fullname = trim($_POST['fullname']);
  $email = trim($_POST['email']);
  $message = trim($_POST['message']);
  $status = 'Pending';
  $datetime = date('Y-m-d');
  $ip = $_SERVER['REMOTE_ADDR'];
  $browser = $_SERVER['HTTP_USER_AGENT'];

  // Insert into database
  try {
    $sql = "INSERT INTO placecomments (fullname, email, message, status, datetime, deleted, ipaddress, browser) VALUES (:fullname, :email, :message, :status, :datetime, 0, :ipaddress, :browser)";
    $stmt = $conn->prepare($sql);
    $stmt->execute([
      ':fullname' => $fullname,
      ':email' => $email,
      ':message' => $message,
      ':status' => $status,
      ':datetime' => $datetime,
      ':ipaddress' => $ip,
      ':browser' => $browser
    ]);
    echo "Thank you, your comment has been submitted and is pending approval.";
    } catch (PDOException $e) {
      echo "Database error: " . $e->getMessage();
    }
  }
?>
Step 5: Styling with CSS
The following CSS gives a professional look to both the comment section and form:
.blog-comment {
  margin-top: 20px;
}
.blog-comment .post-comments {
  border: 1px solid #eee;
  padding: 10px 20px;
  border-radius: 4px;
  background: #fff;
  color: #6b6e80;
}
.commentform {
  border: 1px solid #eee;
  padding: 20px;
  background-color: #f3f3f3;
  border-radius: 5px;
}
.commentform label {
  font-weight: bold;
}
This gives the entire comment section a clean, modern look that fits most Bootstrap-based layouts.
Final Words
With just a few lines of PHP, CSS, and jQuery, you can build an elegant comment system for your blog or website. It’s fast, secure, and completely customizable, perfect for projects that aim to deliver clean, interactive content experiences.
If you found this tutorial useful, share it with your fellow developers and help them add interactive comment systems to their sites too!